Zone 0, Level 1 (DESKTOP)
LEVEL OVERVIEW
Here you can launch other applications that may be installed for controlling
different types of hardware. Different applications will be represented
by icons as with any desktop.
Key Features
Load/Save, full MIDI Analyser, Application launching.
SCREEN LAYOUT
The desktop is split into three sections, two are static features,
the third is the Control Window.
SECTION ONE
LOAD/SAVE BAR
At the top of each screen is a Load/Save bar, this is a static feature.
All Zones and Levels have access to the Load/Save bar, however available
options change depending on the active level.
Key features
Load, Active screen & Save
![]()
LOAD
Click and hold to activate drop down list, drag to highlight choice
and release click to select.
Load Group
Activates the Load Group window (see Load/Save and Group Files below).
Clear Group
Returns the Space Station to its default state, removing all user elements.
ACTIVE SCREEN
Displays the currently selected MIDI Channel, Group, Bank and Wave.
This information is displayed in two ways. The first displays the MIDI
Channel, Group, Bank, and currently selected Wave for Editing (Zone 2 Edit
Bank). The second displays the currently active MIDI Channel, Group, and
bank to be played by the Keyboard Panel only (see Keyboard Panel below).
SAVE
Click and hold to activate drop down list, drag to highlight choice
and release click to select.
Save Group
Activates the Save Group window (see Load/Save and Group Files
below).
SECTION TWO
CONTROL WINDOW
In the middle of the screen is the Logo, this area will change as different
Levels are activated. All of the functions available for the active
Level will be accessible from within the Control Window.
SECTION THREE
KEYBOARD PANEL
At the bottom of each screen is a Keyboard Panel. This is a static
feature. All Zones and Levels require access to the keyboard. The keyboard
itself is a standard piano style keyboard with 10 available octaves. Selected
and assigned keys are colour coded for quick reference (see LED's at the
end of this section).
Key features
Status Screen, Memory Screen, Song Control Buttons, Time Display Screens,
MIDI In/Out lights, Optionsscreen, Function buttons, Panel Flip Switch,
MIDI Channel Changer, Keyboard Keys, Keyboard Scroll Buttons, Exit Button
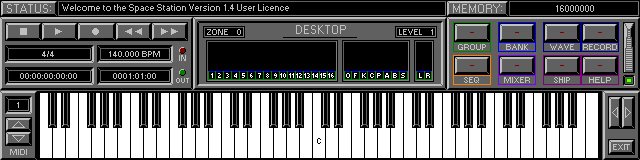
STATUS SCREEN
Displays current activity. Click on status switch to display history
(see Zone 0 Level 2 Desktop\Status History). Histories can be saved as
standard txt files. Prompts are also issued in this screen for required
actions (rather like a live help file). Messages are displayed in
different colours to alert your attention.
Message type
Error Message, Red
Warning Message, Orange
Command Message, Green
Acknowledgement, White
Function not available, Yellow
MEMORY SCREEN
Displays the total memory available.
Activate this switch for full Memory History.
(see Zone 0 Level 3 Desktop\Memory History)
SONG CONTROLS
Play
Click or use Quick Key "Ctrl" (used to activate Loop Mode 2 and Synchronizing).
Stop
Click or use Quick Key "Space Bar", click again to stop audio output
and reset clock and LFO's. Quick Key "Escape" will terminate audio playback
but will not stop the clock.
Record
Single click to activate record mode. Function has no internal use.
Rewind
Click and hold to rewind song position.
Forward
Click and hold to forward song position.
All buttons are used in conjunction with the Remote Control (Zone 1
Level 5 Edit Group\Preferences).
TIME DISPLAYS
Time Signature (top left)
Used to dictate the amount of beats per Bar/Whole note.
Left click to increase value, right click to decrease.
Tempo (top right)
Used to dictate the current clock rate in beats per minute.
Left click to increase value right click to decrease.
SMPTE (bottom left)
Used to display the current SMPTE song position. (see current frame
rate, Zone 1 Level 5 Edit Group\Preferences (Sync))
Beats & Bars (bottom right)
Used to display the current song position in beats and bars.
MIDI LIGHTS
Flash in sync with data transfer operations between the Space Station
and any internal or external MIDI device. These lights will flash as they
monitor MIDI, prior to any MIDI Filter settings (see Zone 1 Level 4 Edit
Group\MIDI Filter).
OPTION SCREENS
Designed for multi functional operations within Zones. The screens
display available options within a current level. Initially the option
screen will be an Analyser, for monitoring MIDI and Audio data.
ANALYSER
1-16
Displays MIDI data on the specific Channel number.
O
Displays all Note On data.
F
Displays all Note Off data.
K
Displays all Key Pressure data (Poly Pressure).
C
Displays all Control Change data .
P
Displays all Program Change data.
A
Displays all After Touch data .
B
Displays all Pitch Bend data.
S
Displays all System Messages and System Exclusive data.
L
Displays the Left Audio output level.
R
Displays the Right Audio output level.
In all other levels, up to four options are made available. Use the
mouse or Quick Keys "F1 - F4" to select option.
FUNCTION BUTTONS
Group
Activates Zone 1 Level 1(Edit Group\Bank Assigner). Designed for handling
Banks of Waves and the current Space Station setting. Active colour green.
Bank
Activates Zone 2 Level 1(Edit Bank\Wave Assigner). Designed for handling
Waves and synth style editing. Active colour blue.
Wave
Activates Zone 3 Level 1(Edit Wave\Wave Editor). Active colour dark
blue.
Record
Activates Zone 3 Level 5(Edit Wave\Wave Recorder). Active colour
dark blue.
Seq
Activates Zone 4 Level 1(Sequencer\Part Arranger). Function not available.
Active colour orange.
Mixer
Activates Zone 5 Level 1(Edit Mixer\Main Mixer). Designed for handling
MIDI data from within a virtual mixing console. Active colour mauve.
Ship
Activates Zone 6 Level 1(Navigator\Ship).Designed for quick and easy
manoeuvring around the Space Station. Active colour purple.
Help
Activates Zone 6 Level 2(Navigator\Help). Designed to provide online
Help on every Function within the active Level. Active colour purple.
FLIP SWITCH
Gives access to further control options(Flip Screen).
FLIP SCREEN
Left and Right Locators
Displays the current position of the Left and Right Locators (used
with Cycle and Punch In/Out modes).
Cycle
Activates Cycle mode (Song loops between Locator positions).
Replace/Overdub
Switches between Replace or Overdub modes. Function not available.
Punch In/Out
Activates Punch In/Out mode (see Zone 3 Level 5 Edit Wave\Wave Recorder)
Click
Activates/deactivates the Metronome (see Zone 1 Level 5).
Master
Activates the Master Tempo Track. Function not available.
Sync
Activates the Synchronizer (see Zone 1 Level 5).
MIDI CHANNEL
Displays the currently selected Channel. Click Arrows to change the
MIDI channel or use Quick keys "Up and Down Arrows".
KEYBOARD KEYS
Used for Assigning and Playing back Waves. The Keyboard will send MIDI
Note On\Off data with a fixed Velocity to trigger internal Waves and external
devices.
(to set Velocity values see Zone 1 Level 5 Edit Group\Preferences)
Left Mouse Click
Plays the Assigned Wave or Waves and any external devices.
Right Mouse Click
Selects the Key and the Upper Wave, click again to select Lower Wave.
(for more on multi layered Banks see Key Mapping, Zone 2 Level 3).
LEDs
Indicates the status of Selected and Assigned keys. Black Key LEDs
appear above the Keyboard, White Key LED's appear below. Each LED consists
of an Upper and Lower section, Colour coded as follows.
Cyan
Indicates the Selected Key.
Green
Indicates a Wave has been Assigned to that Key.
Red
Indicates the Selected Wave.
Yellow
Indicates a Ghost Wave (see Key Mapping, Zone 2 Level 2)
SCROLL BUTTONS
Used to change the Keyboard and QWERTY playing range (octaves).
Left
Shifts the playing range down one Octave.
Right
Shifts the playing range up one Octave.
Click Arrows or use Quick keys "Left and Right Arrows".
EXIT BUTTON
Used to exit Space Station.
QWERTY KEYBOARD
Two Modes of operation are available.
Mode One: MIDI Keyboard (Default)
In this mode the QWERTY will send MIDI Note On\Off data with a fixed
Velocity value, for triggering internal and external devices (see Zone
1 Level 5). For Note layout (see QWERTY Map below).
Mode Two: Normal
In this mode the QWERTY will work as any standard keyboard, for text
insertion.
This mode is automatically activated when text insertion is necessary.
QWERTY MAP
The QWERTY keyboard has been split into two levels, Lower and Upper.
Lower
QWERTY Keys "\" to "Shift" (right-hand) are White Notes (Lowest Octave
and a half).
QWERTY Keys "A" to "#" are the Black Notes (Lowest Octave and a half).
Upper
QWERTY Keys "Q" to "]" are the White Notes (Upper Octave and a half).
QWERTY Keys "2" to "=" are the Black Keys (Upper Octave and a half).
Remember: There are less Black Notes than White, so some Keys are not used.
Note Values
Upper Level Note values follow sequentially from last Lower
Level Note value.
When the Keyboard Panel is in default position (Middle C in the center).
Lower
QWERTY Key "M" will be Middle C. This allows for one Octave movement
down (next left C) to QWERTY Key "\", and half an Octave movement up (next
right G# ) to QWERTY Key "#".
Upper
QWERTY Key "Q" will be A3. This allows for one and a half Octave's
movement up (to E5), QWERTY Key "]".
Scrolling the Keyboard Panel Left or Right will shift the Octaves being
played.
Remember: The QWERTY Map has been designed to work with a standard UK keyboard. Different key layouts will result in Note mismatches.
LOAD/SAVE
The following Functions apply in all Zones/Levels and for all File
Types. Each File Type will also have its own special functions (see Zone
6 Level 2 Navigator\Help).
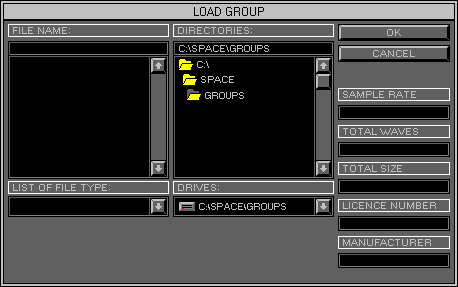
FILE NAME
Load
Displays the currently selected File Name and Type.
Save
Used to input File Name, click to activate Text mode.
FILE LIST
Load
Display a list of available Files to select from.
Save
Display a list of previously Saved Files.
List Scroll
Use the Up/Down Arrows or Scroll Bar to view File List.
Scroll Bar
The size of the Bar is proportional to the displayed File List.
LIST OF FILE TYPE
Displays the current File Type to Load/Save. Click Arrow to active/deactivate
File Type List. Click on Type to select (see Group Files below).
DIRECTORIES
Displays the currently selected Drive and Directory.
DIRECTORY LIST
Display the available Directories. Double click on the Folders to open.
List Scroll
Use the Up/Down Arrows or Scroll Bar to view Directory List.
Scroll Bar
The size of the Bar is proportional to the displayed Directory List.
DRIVES
Displays the currently selected Drive. Click Arrow to view Drive List,
click to select.
OK
Load\Save the file in the File Name screen. Click or use Quick Key
"Return".
CANCEL
Exit Load/Save Window. Click or use Quick Key "Back Space".
SAMPLE RATE
Displays the File Output quality (see Zone 1 Level 2 Edit Group\Output
Settings).
TOTAL WAVES
Displays number of Waves in the selected file.
TOTAL SIZE
Displays number of bytes required to load selected file.
LICENCE NUMBER
Displays the Licence Number from the machine that saved the file.
MANUFACTURER
Displays the name of the file Manufacturer. Space Station File Types
are copyright protected. Unauthorized copying, reproduction, hiring, lending,
public performance and broadcasting is prohibited. Any File Type found
to have a Manufacturer's Name, will comply to all of the copyright protections
listed with the purchase. Any File Type without a Manufacturer's Name can
be freely distributed, but under no circumstances may they be sold. Space
Station Files are encrypted to enforce the copyright laws, and can be traced
back to the file generator.
Red Text
Indicates a Manufactures File has been modified and saved by a user.
(copyright still applies).
To purchase a Space Station Manufacture's Licence, contact Hypnosis
Studio.
GROUP FILES
Contain all Data/Settings from multiple Space Station Zones\Levels.
There are two different types of Group File.
Type One (*.GRP)
Contains all of the settings from Edit Group Zone 1, Edit Bank Zone
2 and MIDI Mixers Zone 5. For Wave Files only the locations will be saved.
Pros
Smaller file size to enable floppy disk transfer.
Wave files remain on original media to conserve disk space.
Disk Volume Names saved and used to prompt on Loading, if media is
removable.
RAM Doubling Effect where Wave Sample Rate is greater than Output Rate.
Original Wave Sample Rate unaffected by save Output Rate, stops degeneration.
Cons
Wave data not saved.
Remember: Protect or Backup any Waves and their directory locations.
Type Two (*.GPW)
Contains all of the settings from Edit Group Zone 1, Edit Bank Zone
2, MIDI Mixers Zone 5 and the Wave data.
Pros
All elements in one file, allowing easier transfer.
Accelerated load times.
Original Sample Rate unchanged, enabling improvements to Output quality.
Wave quality unaffected by re-saving at lower Output Rates.
Cons
Waves converted on loading will be saved at the current Output Rate.
Remember: Increase Output Rate for Wave Loading and decrease for Playback. The RAM Doubling Effect will not work if the Output Rate is increased for Loading.